
On this post I’ll try to explain, as easy-to-understand as possible, the steps I followed to install OpenDaylight Beryllium (ODL-Be) and then linking it to a very small network, only to see how all this stuff goes. A really simple example, though explaining key things.
OpenDaylight is a very large platform, with lots of plugins and features, so it may cause some confusion and initial paralysis to newcomers. Thus let’s keep things simple.
1. Installation overview
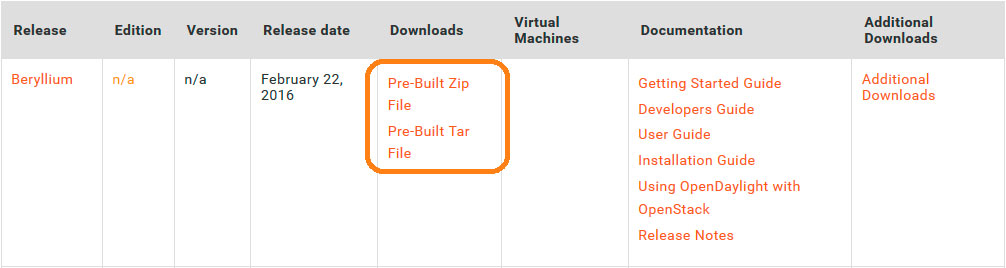
The easiest way to download and install ODL-Be is through its Karaf distribution. We can obtain the Karaf pre-built package either as a .zip file or as a .tar file —same content— from OpenDaylight’s downloads page.
Karaf —a carafe in Dutch— is a container —think of a physical container— inside which we can deploy different kind of applications. Acting as a system integrator, it enables assembling lots of small packets or bundles —usually OSGi— to compose a big system. So it’s a very suitable solution to pack big modular systems —like OpenDaylight. Furthermore it’s written in Java so it may run both in Windows and Unix-like operating systems —as long as they have Java SE installed (JRE).
So what we’re going to do is simply download the Karaf package into a system where we’ve previously installed the Java Runtime Environment. That’s all.
Regarding the OS requirements, despite Karaf can run both in Windows and Unix-like systems, some OpenDaylight features require Linux, and some more specifically a 64bit-Linux, thus the best option seems to obtain a 64-bit Linux distribution —RHEL, CentOS and Ubuntu are recommended.
2. Setting up the environment
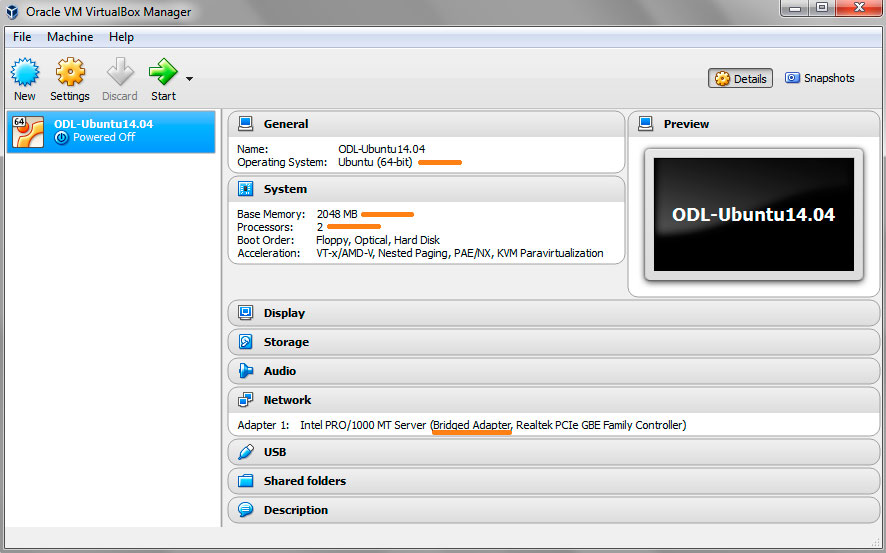
I’m going to use an Ubuntu 14.04 LTS 64-bit server —cause it’s the one I’m most familiar with, and the latest Ubuntu’s LTS release to date— installed into a Virtual Machine (VM) that I’ll deploy using Virtualbox —any other virtualization platform is also suitable.
Regarding the VM settings, I allocated 2GB of RAM and 2 CPU cores, which is enough to run ODL-Be within a test environment. A bridged adapter will do the job at networking.
So let’s power on the VM, and proceed with a regular installation of an Ubuntu server. The only server-specific feature we’re going to install is OpenSSH.
At this point we’re going to assume that everything went ok during the installation, and we already have our new Ubuntu server running, with a bridged access to the Internet. In my case I’m running sdnuser@USERVER, with eth0 as network interface, and an ip address of 192.168.1.121 via DHCP. Let’s manually configure this interface to have a static ip:
sdnuser@USERVER:~$ sudo nano /etc/network/interfaces[code]auto eth0
iface eth0 inet static
address 192.168.1.100
netmask 255.255.255.0
gateway 192.168.1.1
dns-nameservers 8.8.8.8 8.8.4.4
[/code]
And restart the eth0 interface in order to get its changes applied:
sdnuser@USERVER:~$ sudo ifdown eth0
sdnuser@USERVER:~$ sudo ifup eth0
The next step is to install the Java Runtime Environment (JRE). ODL-Be runs on Java 7 or higher JVM versions. To check whether Java is already installed and its version, we may run «whereis java» and «java -version» commands. If not installed, let’s install it:
sdnuser@USERVER:~$ sudo apt-get install openjdk-7-jreAt last, we need to define the JAVA_HOME environment variable —Karaf will need it. By default Java is located in «/usr/lib/jvm/java-<version>» directory. To set up our JAVA_HOME environment variable we may run:
sdnuser@USERVER:~$ export JAVA_HOME=/usr/lib/jvm/java-1.7.0-openjdk-amd64This command will only be effective in current shell session. To persist the JAVA_HOME variable we must edit our «.profile» file and append a JAVA_HOME definition:
sdnuser@USERVER:~$ nano .profile[code]export JAVA_HOME=/usr/lib/jvm/java-1.7.0-openjdk-amd64
[/code]
Save, and that’s all! We’ve already set up the required environment to install our OpenDaylight.
3. Getting OpenDaylight Beryllium
For convenience, from now on I will always access the Ubuntu-server VM’s shell through an SSH client —I’ll use PuTTY, but any other client will also do the job. As a reminder, note that this VM is now accessible at 192.168.1.100 static ip address. So SSH to the VM and log in.
Now I’m going to download the OpenDaylight’s karaf distribution .tar package from the official OpenDaylight’s downloads page to my <HOME> directory:
sdnuser@USERVER:~$ wget \
https://nexus.opendaylight.org/content/groups/public/org/opendaylight/integration/distribution-karaf/0.4.0-Beryllium/distribution-karaf-0.4.0-Beryllium.tar.gz
Unpack the tarball on same <HOME> directory —or wherever we want ODL-Be to stay:
sdnuser@USERVER:~$ tar -xvzf distribution-karaf-0.4.0-Beryllium.tar.gz
Thus now we have a distribution-karaf-0.4.0-Beryllium folder in our <HOME> directory, which contains everything we need to run ODL-Be. Is that simple.
There’s no need to compile or install anything else. As I’ve mentioned before, ODL-Be is distributed through a container —Karaf—, meaning that to execute ODL-Be all what we need to do is first running the container, and then through the container’s console add to the execution plane all the OpenDaylight’s features we want to deploy —modularlly.
4. Running OpenDaylight Beryllium
So to run OpenDaylight we’ll first start the Karaf container in regular mode, by doing:
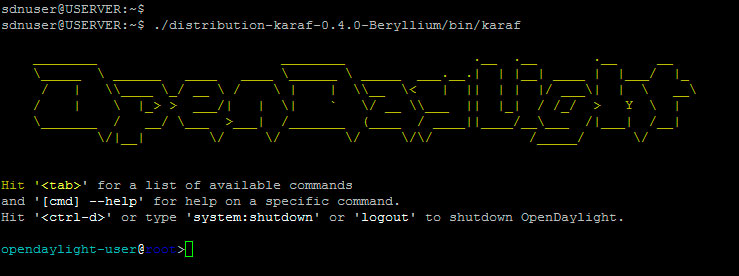
sdnuser@USERVER:~$ ./distribution-karaf-0.4.0-Beryllium/bin/karaf
And we’ll see the following on the command line console:
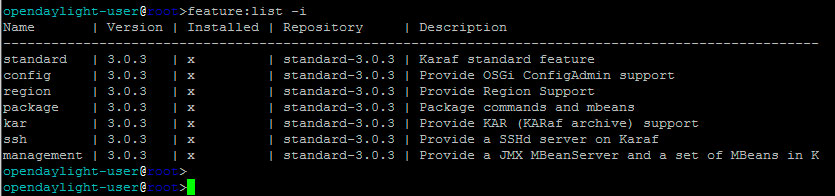
OpenDaylight’s Karaf is now running, and is ready to deploy all the features we want in our scenario. By default there’s nothing deployed, only a few karaf-related bundles. We can see it by typing the «feature:list -i» command, which lists all installed features:
Now the question is: which ODL-Be features do we need to install? And the answer is: depending on what we want to do. OpenDaylight has lots of features, and we’ll only install the ones we need to accomplish our purpose.
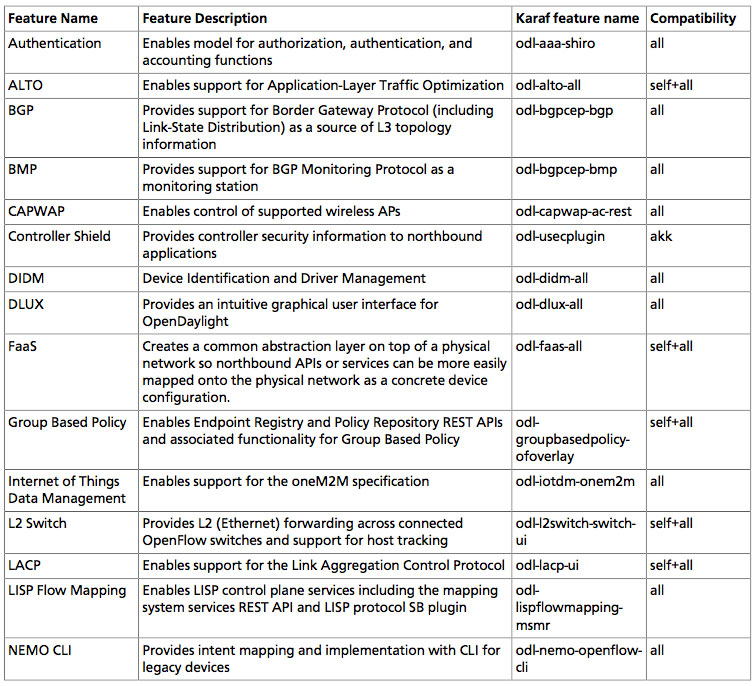
On the following table there’s a complete list of ODL-Be features that can be installed:
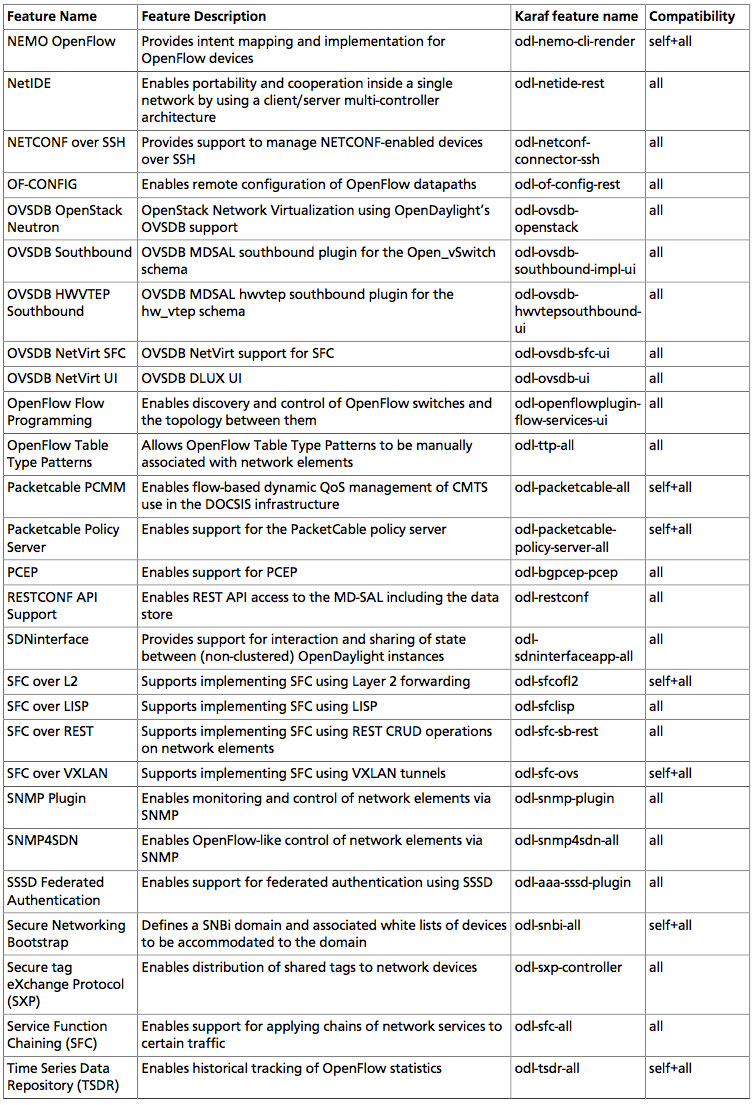
 «all»: can be run with other features — «self+all»: may interact badly with other «self+all»
All ODL-Be features begin with an «odl-…» name. We can obtain more information about a particular feature by typing «feature:info <feature_name>«. Using the <tab> key we can complete names and commands, which is very useful.
To install a new feature we’ll use the «feature:install <feature_name>» command. That simple. We can install each feature separatelly, with no need of rebooting. However, some features have dependencies on other features, which are automatically resolved, meaning that by installing one feature some other features may also be installed.
Normally Karaf remembers all features & bundles installed. Uninstalling a feature using Karaf’s console is not supported in ODL-Be. To uninstall any feature, we must shut down OpenDayligth’s Karaf, delete ~/distribution-karaf-0.4.0-Beryllium/data directory, and start it up again. It resets OpenDaylight into a clean initial state.
To shut down OpenDaylight we’ll type «system:shutdown» or «halt» on Karaf’s console; or also by typing «logout«, pressing <ctrl>-d, or closing the console or shell window in case we started Karaf in regular mode.
5. A simple network example
Now we’re going to use ODL-Be and link it to a very simple network. Our main goal is to set up ODL-Be and enable it as SDN controller of an OpenFlow-enabled SDN network.
Taking a look at the ODL-Be‘s services-and-plugins layered architecture, I’ve highlighted —on the following picture— the features we’re going to use in our simple example:
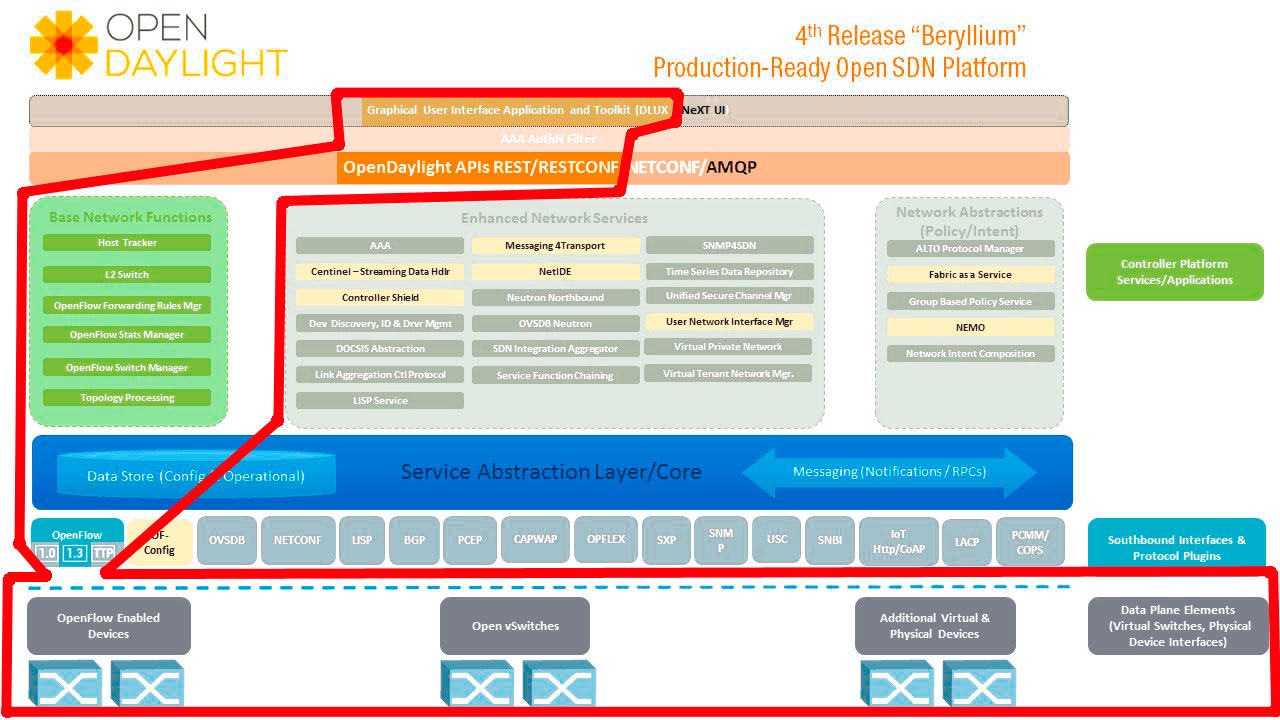 Bottom-up, the features we’re going to use and therefore need to install are:
- The OpenFlow southbound plugin to talk OpenFlow protocol —version 1.3.x— to our OpenFlow-enabled switches —we’ll take care of these switches later. Other southbound plugins are available too, but we won’t use them in this example.
- The Service Abstraction Layer (SAL), which is the core layer, will act to us as an abstraction layer for all the southbound plugins —only OpenFlow in our case.
- The basic-network-functions bundle, whick covers things such as handling packets and flows, being able to discover switches and managing them, tracking hosts, discover addresses and so on, what’s been named the L2switch bundle.
- And finally we’ll install the DLUX bundle, which is a web-based GUI application, in order to graphically see the topology of our network, its switches, hosts, flows… This application has dependencies on the REST northbound API among others.
So let’s install these features on ODL-Be. Assuming we have our ODL-Be running in its initial clean state, the first thing we are going to install is:
opendaylight-user@root>feature:install odl-l2switch-switchThis bundle not only installs all L2switch features but also —through its dependencies— all required SAL components, the OpenFlow plugin, and others. See it:
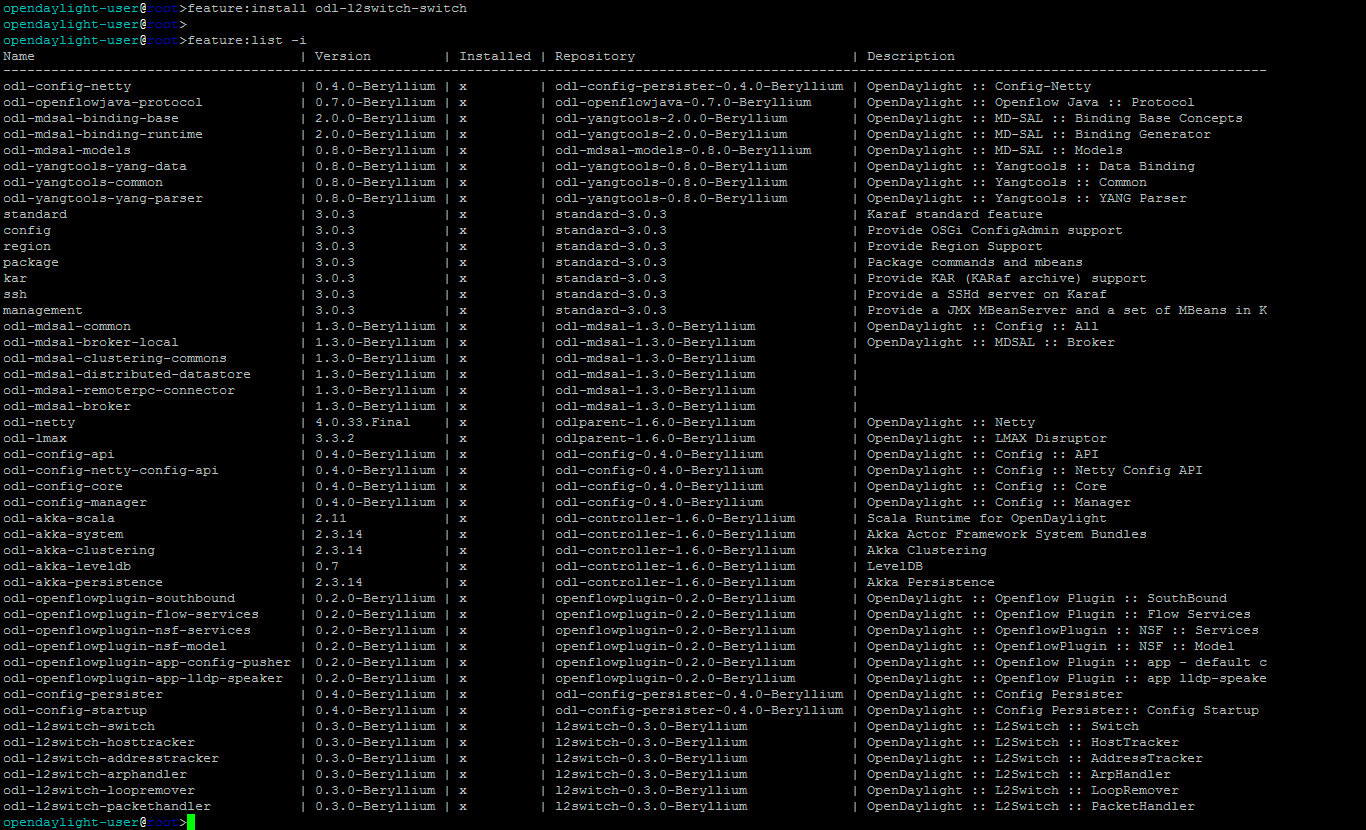
Hence we realize that the only missing bundle to install is DLUX —and its dependencies:
opendaylight-user@root>feature:install odl-dlux-allThat’s all! We’ve already set up our ODL-Be SDN controller to accomplish our purposes.
The next step is to set up a simple OpenFlow-enabled network and link it to our brand new ODL-Be controller. An easy way to do it is by using OpenvSwitch, which is a free and open-source OpenFlow-enabled virtual switch that we can easily install in our machines. But an even easier way is by using Mininet, a fantastic tool that allows deploying into a single machine an entire virtual network of interconnected OpenvSwitch switches and virtual hosts.
So I’ve downloaded a Mininet VM image from its web page, then imported it into my Virtualbox platform, changed the network adapter setting to ‘bridged’, and started it up. The default login and password is mininet.
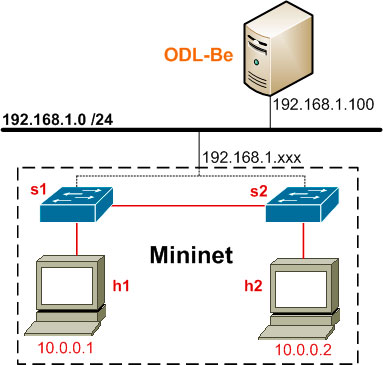
Inside Mininet VM, to set up a network topology of two connected OpenFlow1.3-enabled switches —with a single host on each switch— and link it to our ODL-Be SDN controller, we’ll run the command:
mininet@mininet-vm:~$ sudo mn --controller=remote,ip=192.168.1.100 \
                              --topo=linear,2 \
                              --switch=ovsk,protocols=OpenFlow13
I’m not explaining here Mininet in detail because it’s out of the scope of this post. Let’s simply assume that we’ve created a network topology like the following:
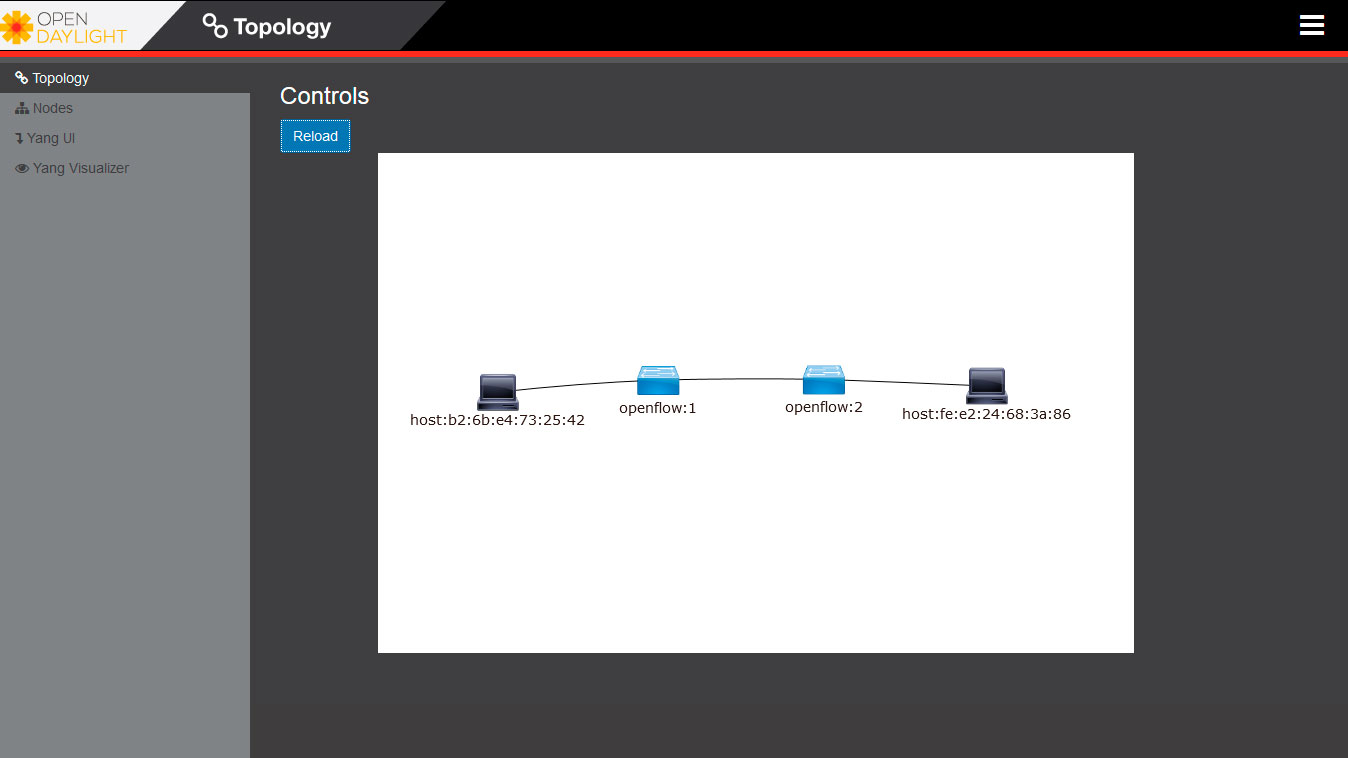
Now it’s time to check if we can see our network at DLUX GUI in our ODL-Be controller. To connect to the DLUX interface we must open a web browser and go to address:
http://192.168.1.100:8181/index.html
The default Username and Password is admin. We proceed to log in and we’ll indeed see our SDN network topology. If we can’t see the hosts is because we need to first execute on Mininet’s console the «mininet> pingall» command.
And that’s all. Or «that’s the beginning» I should properly say. We’ve seen how to install OpenDaylight Beryllium by explaining each step, also a bit of its characteristics and architecture, how to run it, and how to use it on a simple example. The very basics.